HOW TO USE THE A BETTER SIGN DESIGNER
![]() Before We get into the nitty gritty of how this designer works. I did make a very short, very fast video that is designed to simply refresh your memory on some of the buttons. there is also an interactive tutorial that you can find HERE. If you need or prefer the long version, keep reading!
Before We get into the nitty gritty of how this designer works. I did make a very short, very fast video that is designed to simply refresh your memory on some of the buttons. there is also an interactive tutorial that you can find HERE. If you need or prefer the long version, keep reading!
The Designer functions the same on phones and computers but we will be looking at the computer view since it will save some space visually (landscape view).
Our designer is a special tool made just for our website. I know this to be true because I am one of 2 people that actually made it. I did a majority of the graphics and the overall presentation of the designer. Shout out to my developer friend Alex, who lives in Italy. He is the developer who actually coded the whole thing, which is pretty incredible! Together we think what's come about is a pretty incredible designing tool.
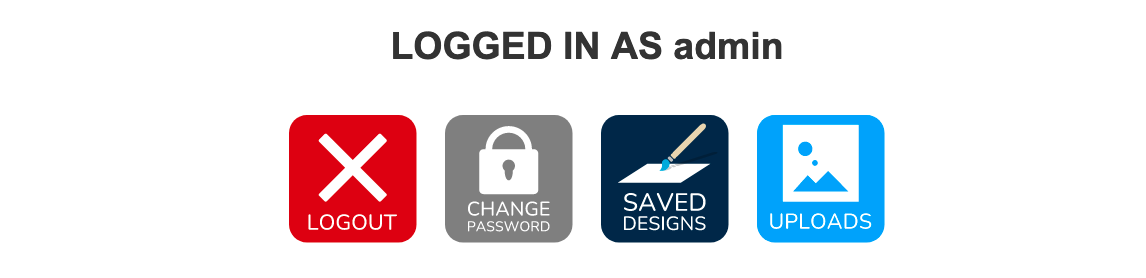
Starting at the top right we have our LOGIN system. From here you can check on SAVED DESIGNS you saved by using the SAVE / SHARE DESIGN button that is located at the bottom of the designer. If you are signed in your design is saved to your account until you decide to delete it. If you are not signed in then your design will expire in 30 days.
The other important button here is the UPLOADS. While logged in, any photo you upload will be saved in this section for you to reuse on other designs. when clicking the uploads button in the main design page you will have access to your photos as well as the usual options.

This area SHOULD be self explanatory, but just in case. This is where you adjust the size of your selected sign. The dimensions are Width x Height in inches.
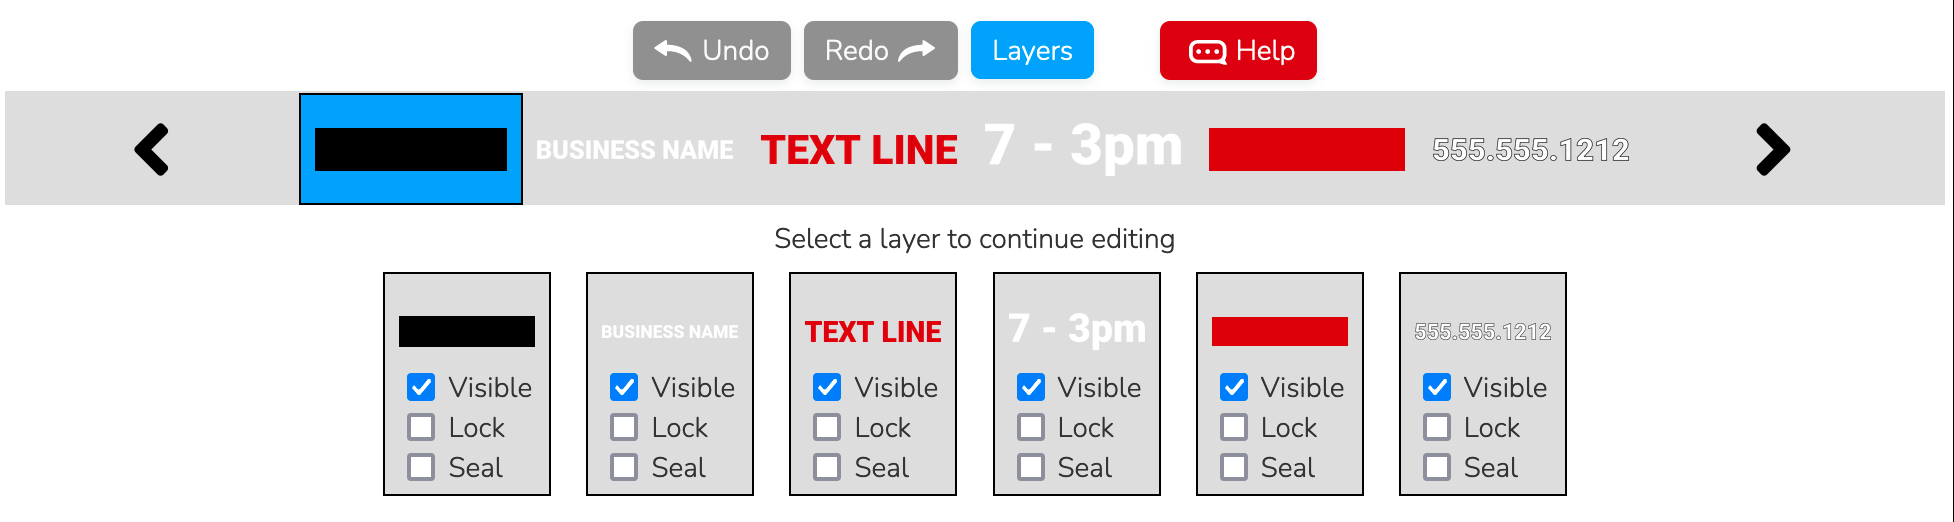
The Undo and Redo functions are as expected, so we won't go over those.
The HELP button will pull up our online chat system where you can talk with an in house customer service rep who can assist you. There is also a link called TUTORIALS in the chat that will send you to a page that explains what each designer button does.
The LAYER BAR is the wide gray bar. It is a list of everything you have added to the design area. We call the things added to this area LAYERS. LAYERS are named this because they actually sit on top of each other. so if you create a box shape, then add some text, the text will sit on top of the box shape.
The LAYERS button is a tricky one. For many users this area is not important, but for those wanting a little more control, here it is! A layer is any object that is added to the designer. from here you can do some things to make designing easier.
• VISIBLE - If you have a lot of object on the screen and maybe are having some trouble grabbing certain elements, this will make what is selected disappear. PLEASE NOTE this does not erase the layer, it simply makes it temporarily invisible while designing. the layer will still be visible when you add to cart.
• LOCK - This will force the selected layer to be unclickable. the layer is still shown in the layer bar though, where it can be selected if you wish to change the color or any other edit. So it simply keeps something from moving in the design area.
• SEAL - Seal is like lock,but it will remove it from your layers bar. This is mostly used by the ADMIN for creating templates to use. This way you can have a layout where only a few elements that should be changed are show. An example would be a white box that is sealed, but the text inside the box can still be edited.
Now let's jump into the main thing that is user here, the Designer Buttons! We will start at the top left and work our way to the right.
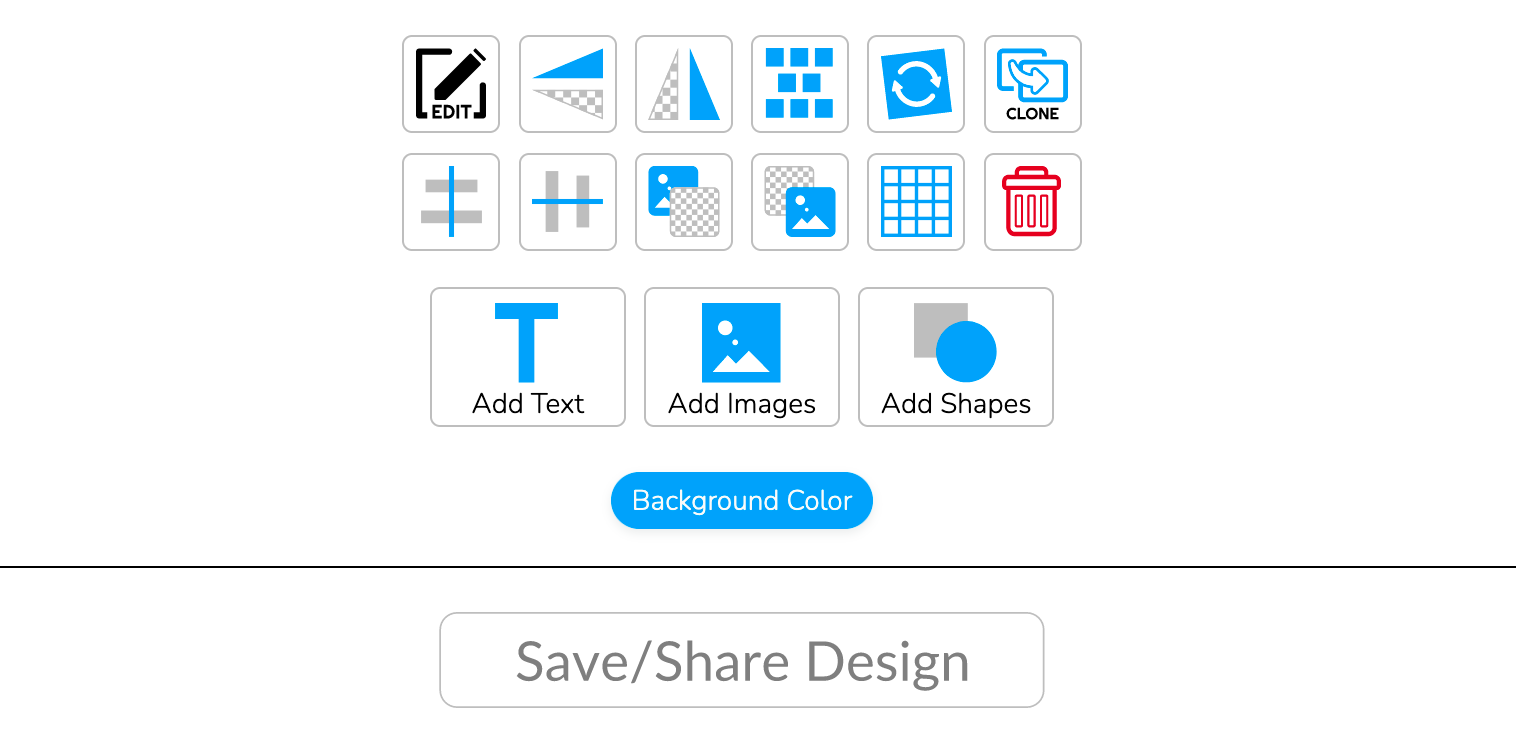
• EDIT - This is the most used button in your arsenal! Select a layer in your design area. If it can be edited (like changing the shape, color or text) this will take you back to that screen to make those changes.
• MIRROR - The image shows a triangular shape one way and that shape reversed. So if you have an image of yourself looking to the left, but want it looking to the right, these buttons will accomplish this.
• STEP & REPEAT - This button looks like some boxes stacked on top of each other. By selecting a layer and pressing this button it will set a pattern of you image. This is commonly used for backdrops where you would want your company logo copy and pasted all over the background.
• ROTATE - This is another very self explanatory tool! Select a layer, press the rotate icon and rotate you layer to your desired angle. You can always hit the RESET button to get back to its original orientation.
• CLONE - This makes a copy of any layer you have selected. The new layer will be copied to the deign area.
• ALIGNMENT - These symbols of bars and sticks is your way of aligning a layer vertically or horizontally based off of the design area. An example would be if you have some text but need it to be centered perfectly in the middle of your design. Click vertical align, then horizontal align to accomplish this.
• MOVE TO FRONT & BACK - This shows an image that is behind a kind of checkered patter to show that it will move your selected LAYER(or image)to the back or front. You will see this reflected in the LAYER BAR as it keep all of your layers in order.
• GRID - This creates a series of red lines on your design. This is useful for lining up layers to be in line as you wish. PLEASE NOTE this will not show when added to the cart.
• TRASH - This deletes the layer you currently have selected. Remember if you accidentally delete something you can always use the UNDO button to get things back!
The next three button are for adding NEW TEXT, IMAGES and SHAPES.
BACKGROUND COLOR will change the entire background of the design area. This color is not selectable in the design area and can only be changed by changing it via the background button. If you need something more "artsy" like only part of the background be a different color, we recommend adding a SHAPE to your design. You can then change the color and go into the LAYERS button and lock the layer down. this way you can continue designing without that color moving around.
SAVE / SHARE DESIGN - If you would like to save your design this will give you a link to that. You can share it to multiple social media platforms, email it or copy the designer code. these codes expire in 30 days but If you are LOGGED IN you can save the designs to your account where they will remain indefinitely.
That just about wraps up this in depth tutorial for the A Better Sign Designer! If you have any more questions drop a comment below or open up or online chat and talk to a customer service rep to get some answers. Besides designing things yourself, we offer graphic services to help you with designing just about anything sign related. If you ever have any problems or request any changes to the designer, WE ARE LISTENING! Feedback will help us make things better which means you will hopefully stick around and use us for your sign needs in the future.
THANKS FOR READING!
![]()